Tuesday, August 21, 2012

August NEW Releases ... by Monica Burns

This month I have decided to share the layouts by the talented A2Z Design Team members individually to showcase each and everyone of theirs unique scrapbooking style. Sometimes when we do the NEW Releases, there's so many layouts that they just muddle into one. 
So first up today, here's all  NEW RELEASE layouts by
Monica Burns.

"I Adore You" ...
Monica has also used "Floralette - Bird 10" on this layout.

"I love you this much" ...

 "So Happy Together" ...

 "His Smile says it all" ...
also using "Shapes - Arrows 01".

 "Cuddles" ...

 "Grins & Giggles" ...
also used "Corner 01".

 "My Family" using "Shapes - Tree 15" ...
also used "Flourishes".

 "Dream like there's no tomorrow" ...
Love what Monica has done with "Floralette - Butterfly 05" on this layout.

 "Her Smile says it all" ...

 "Sun Surf & Sandcastles" ...

 "Too Much Energy" ...

 "Love makes the world go round" ...

"Family"
using NEW Scraplets "Doodlet 09 - Bird" ...

 "I Love my Ouma"
using NEW Scraplets "Doodlet 09 - Butterfly" ...

Thanks Monica for your beautiful layouts and the inspiration in using the August Release of A2Z Scraplets.

... Next Design Team member to share ...

Tracey Thorne (being shared shortly).

Monday, August 20, 2012

Birthdays & Father's Day card making day....


I must admit I am not much of a cardmaker. But I decided that I best hurry myself up and start creating  a few cards as the stockpile that I did have was low and my Father-in-Law will be celebrating his birthday and Father’s Day in the next couple of weeks. Goodness knows how much I despise spending so much money on a commercial card when I know that I could have made it for at least a tenth of the cost so that is what i have set out to do...   

I have gone with a simple layout, nothing too flash, I don't think he is into all the overtop looks that one can create in a card but he would love the effort & the thought of something made just for him... 

Card 1

I love all the embossing folders available to us in todays market.... i have used this fantastic cogs one to add a little dimension to the card. Then a little October Afternoon paper and some cotton binding and the card is ready for its final touches.... Oh and i have inked the edges of the embossed cardstock too before adhering it to my card. Then a little more decorating by adding a picture from the October Afternoon cardstock. 


Next i have chosen to use the Corner 09 and it has been color enhanced with some Antiquities ink. Then some scrapdots where added to give lift before it was added to the card.


and for the finished product I have added some stamped happy birthday text     

**sorry for the shoddy editing - my pics were taken late at night

*************

Card 2

I love the bracket journal block and thought that I would create two cards out of it as one will be given away as a gift in a couple of weeks and the other can go in my stock pile that has dwindled....

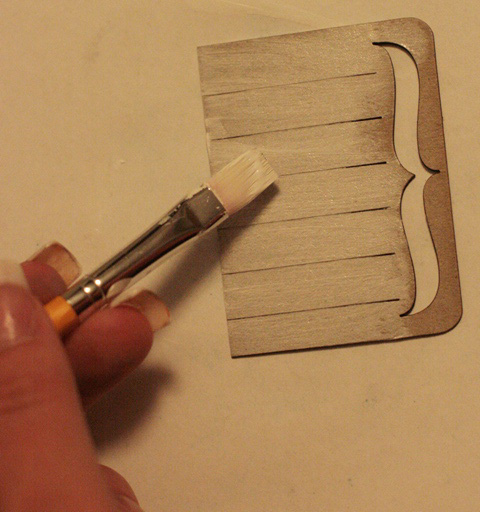
Firstly i found a lot of my Stampin up supplies that I have sadly neglected and put them to use. This fantastic bracket journal block embossed beautifully through the vagabond. Next I measured out half of the A2Z Scraplet and then used my cutter to trim it in half. 


 A good coat of gesso was applied before I sprayed it with some Tattered Angels Tiger Lily mist...


Getting it all ready: I have outlined the border of the chipboard with a grey pen. I then added some ribbon for some added texture and depth. I had some extra blue vellum and used one of my Stamping up tag stamps . Staz- on is fabulous for using on vellum .


Now time for layering: The base cardstock first and then the journal block was added to the front of the card. For the final touch the tag was popped on with some foam dots.
**************************


 Card 3

I have also cut out another bracket journal block from the sizzix embossing template. This time i cut around the brackets to give them more definition. And the very versatile bracket journal block was used again.


Time to add  a little printed paper on the journal block. I have used some Scenic Route paper which was generously glued over the Scraplet and then sanded off the edges. After this i have added some ribbon that i purchased from Typo and have stamped a cute little suitcase travel stamp that was from Kasazz...


Next for another color to compliment all the blue - I have decided to stamp out a 'for you' Stampin Up tag stamp to lay on top of the embellishments.I have used foam dots again to raise the tag up off the journal block. Finally i have layered the large bracket block off center and then added the remainder embellishments with tape.


Thank you for popping by & have fun creating for that special Man in your life.

tracey


Wednesday, August 15, 2012

Back from Publication

Hi Eveverybody. Today I have a layout to share with you that I made way back in March for our A2Z challenge but however I never got to add it to the blog as it was picked up by Scrapbooking memories Australia for publishing. Conditions of publishing are that you do not showcase your creation for 2 months after publication and I am now able to share with you all. It was published in Volume 14 No. 9.
I adore this A2Z You and Me Title and have added it to a A2Z heart that I kindy glitzed up with bright red glitter and then added diamond glaze on top to make it pop. Hope you have enjoyed my share
Till next time Happy Crafting
Caz
xo

Sunday, August 12, 2012

August Inspiration with Amy Prior

Hi everyone! So excited to be sharing some recent fabulous creations with you all today. Also very excited for our upcoming releases eeekkkkk, be sure to keep your eyes out as they are AMAZING!!!! Ok now on with the show as I have lots to share because I just cannot help but add A2Z Scraplets to basically every single project lately. Have you got some in your stash? You are missing out if you don't and be sure to tell your LSS that you want to see A2Z Scraplets stocked there too.

My first layout is titled Sweet and is of my gorgeous girls as per usual hehe. For this layout I have used the beautiful Picture Frame 15...


The frame was coated with some splodges of Gesso and when dry, was sprayed with Brown Suede Glimmer Mist. I then added a doily over the top as my photo was just a little too small to fill the frame.


For this next layout of my friend's son, I have used the Shapes - Nested Stars + Cheeky SR -  Word. I am just loving the nested shapes from A2Z at the moment, they are so handy for using as a mask as well as so many uses on layouts.


To decorate both the star and the title, I have added some Crackle Paint and allowd to dry. I then added some embossing powder and followed with some Perfect Pearls Spray Mists for a little glimmer. I love how the embossing powder melts into the cracks of crackle paint.


Next up I have a layout of hubby and me using Shapes - Heart & Swirl 4 + Shapes - Chicken Wire. I just love this chicken wire, there is so many uses and hexagons are such a huge trend at present!


These chipboard pieces were very simply sprayed with some fabulous Glimmer Mists. I dried them with a heat gun straight away to get the pooled up glimmer effect.


My next layout to share is using the fabulous Spaghetti Monster title - SR. 


How cute is this pic of my little Chloe nawwww. She loves her Spaghetti Bolognaise still! The title was sprayed with Copper Cattail Brown Lindys Stamp Gang and the little squiggly spaghetti pieces were covered i n Platinum Liquid Pearls. Checkout the bed of spaghetti my layout is resting on LOL oh how I love twine!


Next I have a layout of my beautiful girl Mia when she was only 4 months old nawwww. I have used Doodlet-21 for this layout.


To decorate the chipboard here, I have painted it with black crackle paint and then sprayed with some Pink Perfect Pearls Mist. Can you tell my fave technique at the moment is crackle with added layers LOL. I then topped it off with a beautiful bling embellishment from Passion 4 Paper. 


Last but not least is a layout of my 20th birthday which honestly seems a century ago LOL. Checkout my skinny gorgeous self *sigh* I fell pregnant about 3 months later and waved goodbye to that body and beauty hahaha. Anyway...for this layout I have used some Li'l Range - Stars. I just adore stars and hearts. They are perfect additions to most pages!


To go with this fabulous bright layout, I have painted the stars with Liquid Pearls and to add some more texture, I have zapped them with a heat gun so they boil and melt. Usually I would not try this but I wanted the bubbled up effect and it turned out super cool! I then inked the edges with some Black Archival Ink and Voila! Layout finished.


Well that is it from me today, I hope I have helped inspire you with different ways to use and decorate your chipboard pieces. Be sure to keep your eye out for the New releases coming very VERY soon and don't forget about our fabulous Recipe Challenge on now!

Until next time...happy scrapping!

Amy Prior xxx

Thursday, August 2, 2012

August Challenge

This month it was my turn to pick a challenge for the month and I decided to mix it up a bit by creating a "Recipe Challenge".  I had previously done a recipe challenge and I enjoyed doing it so I thought that everyone else may enjoy it as well so I created a Recipe and set the DT girls to work. 

I hope that you all get inspired to get in and have a go at the challenge as there are some great A2Z Scraplets up for grabs.

Here is the Recipe


and here is my take on the challenge

Samantha Bailey 
"First Day of School" 


next is Amy Prior with "100 Times Per Day"


Carolyn Zabel


Monica Burns
"Family"


Tracey Thorne
"You are my Forever"


Irit Shalom
"Fancy Little Thing"


The DT girls have outdone themselves this month with their stunning creations.  I hope they have inspired you to have a go at this challenge.

Have a wonderful day :)

Sam


August 2012 Challenge Participants
1. Belinda Scott
2. Michelle Hodges
3. Monica Brady
4. Anja van der Velden
5. Shauna Arnold
6. Karen McLaughlin