Showing posts with label glitter. Show all posts

Wednesday, September 26, 2018

"I hope we catch a fish" Scrapbook layout by Louise

Hi Crafters


Here to share a new scrapbook layout "I hope we catch a fish"


The "Hope" word was all that was left from the "Dream word set" but I just couldn't work out how to use it. I started by covering it with black gesso.
Then I looked through my photo stash and came up with this one of Master C throwing a line.
I decided to turn the word "hope" into a longer title and used up some of my letters.


I left the layout quite simple with lots of paper tearing and layers.
The black star is a piece cut with my Silhouette Cameo.


I also used one of the "Nested Circles" and covered it with glitter - then added patterned paper behind it.


Items on this page are from the Cocoa Vanilla Studio 'Boys Rule" collection.


Thanks for visiting.
Happy Scrapping. 

Wednesday, September 19, 2018

"Cheeky" Scrapbook layout by Louise

Hi Crafters


How bout a really, really "boy" layout - "Cheeky"


The inspiration for this page came from the pop of green in the photo.
Master C loves green so I wanted to make this a page with a strong green focus.

This collection is from Jillibean Soup - 2 Cool 4 School.
I decided to pair it with some of the Nested Circles
Each given a different colour of Distress Crayon.


I've also used the "Cheeky" word and covered it with Colour Blast Embossing Powder. 


I haven't added too much mixed media but I did add some Nuvo glitter paste to the background through a star stencil!


Thanks for visiting.
Happy Scrapping. 

Wednesday, September 5, 2018

"The best day" Scrapbook layout by Louise

Hi Crafters


Here to share a new scrapbook layout "The best day"


This page features two chippies.
First the Leafy Stems


I decided to colour them with my Distress Crayons, so first they got a coat of white gesso.


Then with my chosen colours, I draw on the leaf and smudge the colour with my fingers.


Repeating the process with different greens.


Finally, just to bring everything together, I added a touch of green glitter paste.


I love how they look, tucked into the flower cluster.


I've also used the Picture Frame 15
Covering it with Nuvo embossing powder which has a gorgeous glitter element.


I love how cute this photo is of my boys at Dreamworld.
So simple to put together with a easy torn paper background and lots of A2Z Scraplets Chipboard elements.


Thanks for visiting.
Happy Scrapping. 

Wednesday, March 28, 2018

"So happy together" scrapbook layout by Louise

Hi Crafters


Time to share a new layout "So happy together"


So 2018 has seen me focus on stash busting instead of "shopping" for new supplies.
I am loving the challenge of creating with items already available to me.

Behind the photo you'll see the circular piece of black and white.
This is actually a centre piece of chipboard left overs that I've covered with washi tape and paper strips.


To title this page, I've used the "So happy together" word


Firstly I've applied a coat of Colour Blast Embossing Powder "Just Blue".
Then I've masked the "So happy" words with washi tape before painting "together" with gel medium.
While the gel medium is still sticky, I've sprinkled the whole word with glitter.

Other elements on the page are a Charm's Creation star, Colour Blast paste and lots of paper layers.

Thanks for visiting.
Happy Scrapping. 

Wednesday, October 11, 2017

"Shine Bright" Scrapbook layout by Louise

Hi Crafters


My layout "Shine Bright"


I just adore this collection from Simple Stories.
I decided to team it in a simple paper based layout with the
Spotty Circles Set


Firstly I've given the chipboard a coat of black gesso.
Then with gel medium and a fine paint brush, I've painted the circles and sprinkled glitter over the top.
To finish, I've given the whole chipboard a coat of spray gloss sealer so that the glitter will hold.


I would normally use white cardstock background, so to challenge my creativity, I started with black cardstock and added some splatters in Colour Blast Shimmer Spray "Bling".

For something else a little interesting, before I attached the white & pink striped paper, I stitched it with black cotton. Then the outside of the black cardstock with white cotton. Giving a lovely two tone effect.

Thanks for visiting.
Happy Scrapping. 

Wednesday, September 27, 2017

"Yummy" Scrapbook Layout by Louise

Hi Crafters

to share a new layout "Yummy"


I've gone really bright and white with this page.
I chose the
which I've firstly added a coat of gesso, then coloured with Distress Crayon.
I highlighted the word with Stickles glitter.


I also created a border with 
treated with white gesso and then I've added Stickles glitter dots again.


I've used the packaging technique on the background - with Distress Oxide Ink.
Then added splatters of Colour Blast "Carribean"
Some background stamping and papers from Cocoa Vanilla Studio.

Thanks for visiting.
Happy Scrapping. 

Wednesday, October 19, 2016

"Love" scrapbook layout + chipboard technique by Louise

Hi Scrap Friends

Louise with you today.
I've got a layout to share + one of my favourite chipboard techniques.

My page "Love"


For the "Love" chipboard
I've treated it as follows:

Such a fun technique which can easily be applied to a variety of chipboard products.


My layout also includes lots of other textural elements - twine, straws, tags, texture paste all coming together with a green colour theme.


Thanks for visiting.
Happy Scrapping. 


Tuesday, January 26, 2016

Anniversary Escape

Hi, Deb here with you again today. I thought I'd share a page I did of a little place we went to for our wedding anniversary. We try to organize our holidays around that time of year to celebrate a very special day. 

I have used the Anniversary Escape title and simply colored it, added dimensional paint and sprinkled a little bit of chunky glitter on. 


This gorgeous embellishment was made by our DT member, Lauren. She makes the most gorgeous chipboard embellishments that are just beautiful for special cards or pages. 


A close up of the chipboard showing the glitter. 


Materials used:
A2Z Scraplets Chipboard
Kaisercraft papers
Basic Grey papers
Bella Bling
Doily

Until next time
Happy Scrapping
Deb


Monday, April 27, 2015

Dare to dream

Hello again!

Today I'd like to share with you a layout of my beautiful daughter.  The photo was taken in August last year for her year 11 semi-formal.  We are already gearing up for the big one this year - dress has been purchased, hairdresser chosen, just to organise other things like make-up, transportation and jewellery now.  Still so much to do….

Anyway, here is my layout.


 On this layout I have used an A2Z chipboard frame.  I wanted to try something different, so I coated the frame with gesso, then applied some texture paste through the Jenni Bowlin Mini North Star template.  Once dry, I dipped my paint brush into the Prima spray and dabbed a little onto each star, finishing with a dot of Kindyglitz in the very centre.  The photos really don't do this layout justice - it is such a pretty, glittery page…might be time to learn some new photography skills I think.

Some closeups...


Wishing you a wonderful week.
Until next time,
Yvette


Sunday, March 8, 2015

My take on the March Challenge

I loved this challenge - the mood board is brilliant. The colours stood out to me and I just had to use the new Kaiser Collection Shine Bright. You can find it at Scrapping Life. You can pick any element out of the inspiration picture - Challenge March 2015 - and use that to create. Upload, post to our Facebook wall or email to blog@a2zscrapelts.com.au to enter. ENTRIES CLOSE MARCH 22ND.

I found this old photo of me, one of the earliest I have and thought it would be a good place to start my story. While I don't remember the time, I do remember what it represents.


I have used one of the upcoming April Release words. I painted it, coated with dimensional magic and then gave it a layer of fine yellow glitter followed by a layer of chunky glitter.


A close up of the embellishments used.


Remember our website is now open for retail sales. As we are both wholesale and retail you will find the last two releases only available to trade clients. We are also adding a wider range of stock to our store so keep popping in to check out what's new. 

Until Next Time
Happy Scrapping
Deb

Sunday, November 16, 2014

Christmas is on it's way!

Hi Deb here today. OMG it's getting close to Christmas again. Where did the last year go??? This sudden startling realization lead me to dig out a photo of the first tree we put up in our new home. With kids and fur babies about it pays to keep the decorations simple and/or out of reach! 

I have used a couple of the new chipboards from A2Z Scraplets's November release, 'Trimming the Tree GR' and 'Geo Trees'


Trimming the tree is very simply painted with an Adirondack paint dabber. Love these, so easy and so little mess to clean up. I've then just given it a covering of dimensional magic to for a bit of 3D and gloss. This is a really great medium for chipboard as you can add bits and bobs to it - glitter, beads, small metal pieces, whatever will fit will stick.


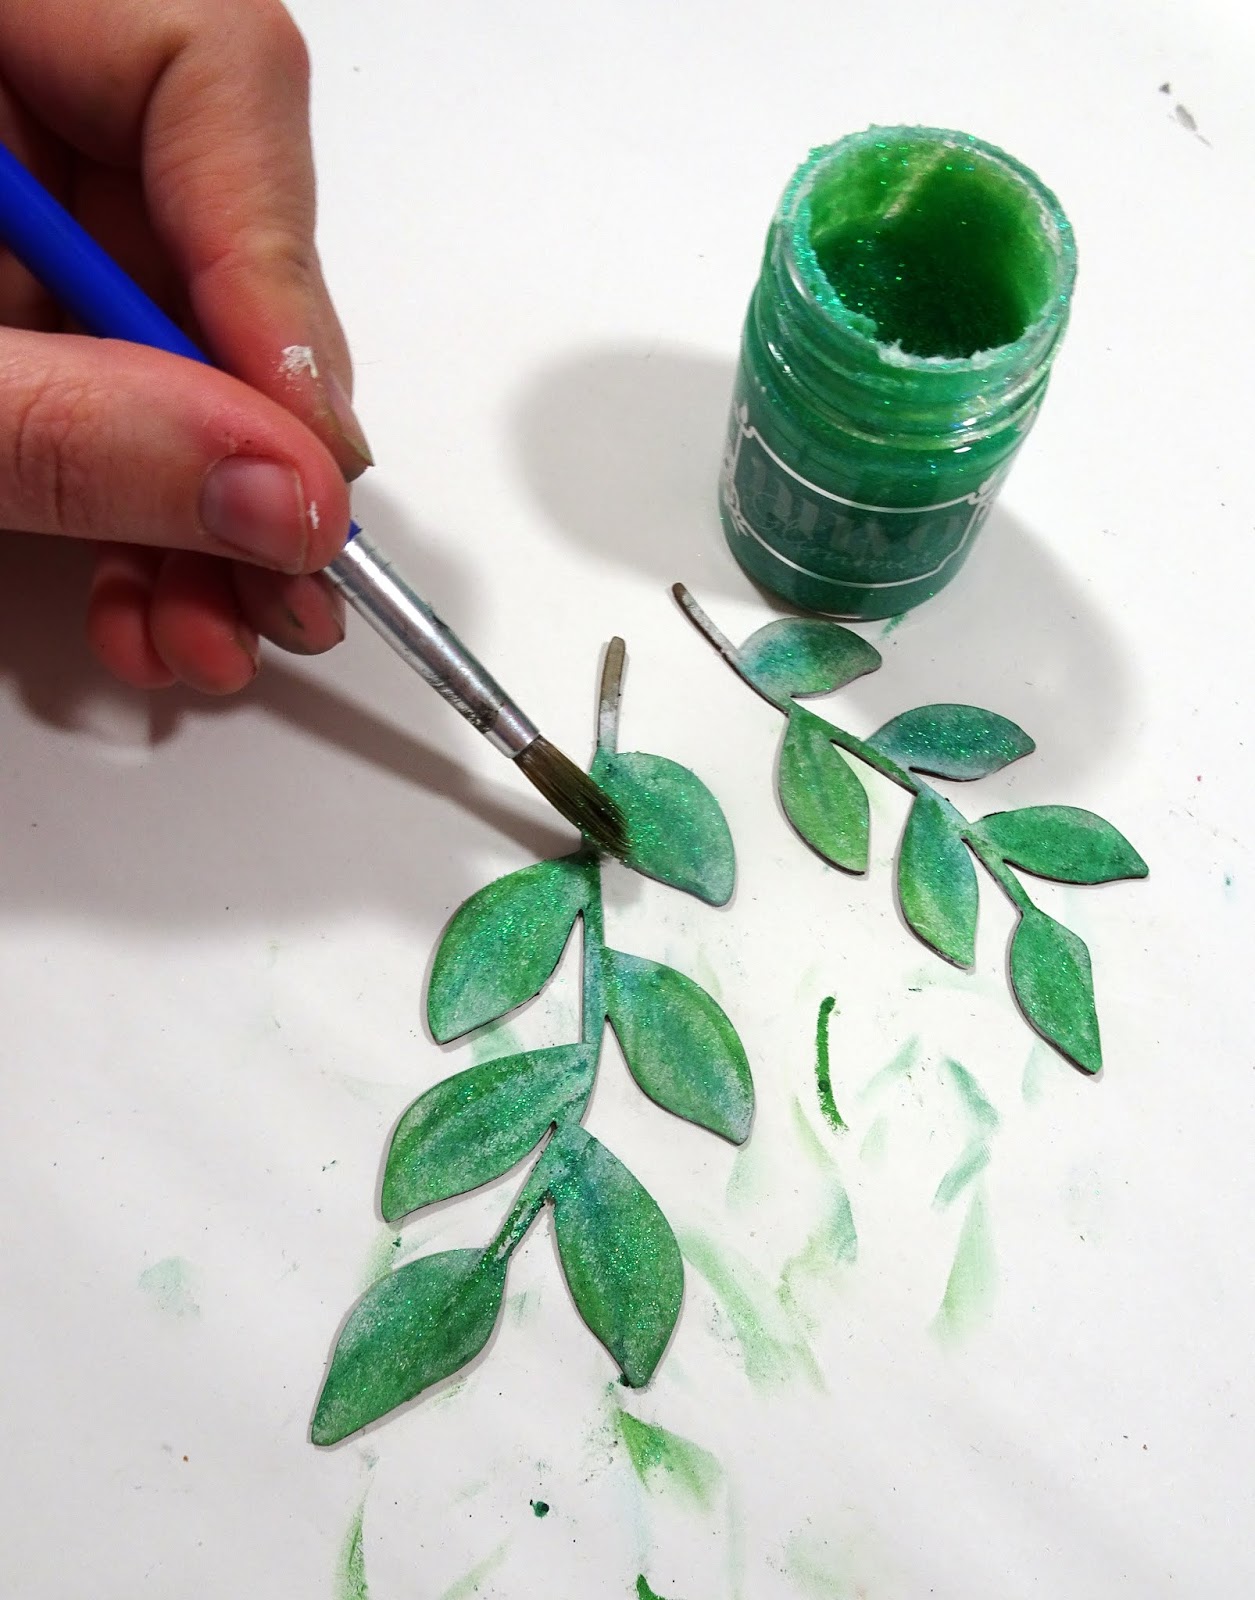
One the trees I have tried something a bit different. Puffy fabric paint and glitter. I applied a thick layer of paint then sprinkled glitter randomly over it. Not covering it completely to allow the paint itself to puff through. Being impatient I didn't bother to let it dry properly before I heated it gently, carefully controlling the 'puff' as I did. I love the effect if has given on the trees.


Materials used: 
Bella papers
A2Z Scraplets
Little Birdie Burlap Doily
Christmas Paper clip

The next page uses one of the Christmas page frames. These are a quick and simple way of putting a page together when you have a few to do.

With this one I have left unaltered and simply written the journalling around the edges. 


Materials used:
Cardstock
A2Z Scraplets


Until Next Time, 
Happy Scrapping
Deb