
Greetings A2Z Scraplets Fans!
Michelle here today sharing a mini tutorial creating
background paper with a new Flourish stencilet 02!
Here is the finished Layout!
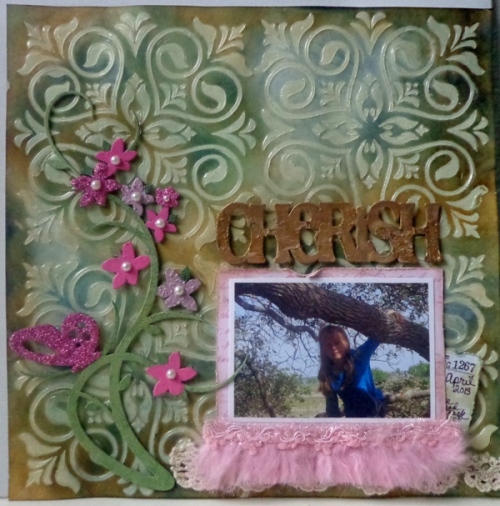
I used Heavy Gel medium to apply the stencilet to the paper!
After the gel medium dried I used Distress Ink Vintage photo and Distress Ink chipped Sapphire.
The cherish word new release chipboard I used some distress ink and added some Creative Inspirations Gold paint over the top
after I distressed the chipboard.
For the new release Floralette I added Distress crackle paint to everything except for the 2 light colored flowers, which I used Gel medium modeling paste with beads for texture! I also used glass glitter in rose for 2 smaller flowers and the butterfly.
I used Creative Inspirations paint on the other flowers
and on the stem and leaves.
I left the LO simple because I really wanted to focus on the
background stencilet design!
Here is the new release of the Flourish Stencil 02!Below are the instruction on how I used this to create the above LO!


two stencil prints to dry before applying the other two to the paper.
As you can see I lined up the stencilet with each outside edge
so I would have room to add the stencil to the other corners.

Here I added the last two stencilet to the paper! The stencilet are dry with this picture that is why the stencilet look more opaque in color!

Once completely dry you can add your paints or inks!
I used Distress Ink Vintage photo and Distress Ink Chipped Sapphire!
The inks were blended and mixed randomly and that is why you will see that I left some of the blue and then you will see some greenish tones because I blended the two colors together! Where you see the areas where it is shiny that is where I left more of the opaque stencil area less covered.
If you don't like some of the shiny look to show just rub some more ink over the opaque area!

The stencilets & Masklets are so versatile and Julie keeps adding more designs! What are your favorites and have you created anything with the stencilets or Masklets? If so please share them on the A2Z Facebook we would love to see them! This new stencilet and Cherish chipboard word will be released in a few weeks!
To view the new releases of stencilets, chipboards and masklets here's the link!
Thank you for visiting the A2Z blog today!
Michelle, GDT.
wow I love this stencil and your LO looks great.
ReplyDeleteI just love your Stenciled Bg and your LO looks really beautiful Michelle :)..
ReplyDeleteThis is absolutely gorgeous, Michelle!! I LOVE how you created that background with a stencil!! Your tutorial is awesome, too ~ thanks for the inspiration!!
ReplyDeleteThis is just amazing Michelle! So love how you did your own background using the stencil and inks and paints! Beautifully done, and works well with the flourish and title! Marvellous page!
ReplyDelete