Wednesday, October 16, 2013

Wedding card

I always admire the beautiful cards that are shared by the many talented cardmakers but have never attempted them, till now! My nephew is getting married in South Africa and I had this lovely A2Z scraplet: JUST MARRIED in my stock that was the perfect size for a card and provided the motivation and inspiration so here is the card to share with you today. I added glitter and Kindy Glitz for some sparkle after painting with silver and gold, then finally coated with Dimensional Magic.


 Just Married - GR
Size Approx: 63mm x 91mm
 
Thanks for viewing and have a great day!
Monica

Tuesday, October 15, 2013

Hello...Hello...

The weeks are just going too fast and being busy with children and work makes it go faster!!!!LOL

Today I want to share a layout I created for this months sketch at Anna's Craftcupboard.


The product I have used from A2Z Scraplets is:


and here are a few close ups:


I have inked the chipboard first followed by a roller stamp with ink.

Hope you have enjoyed looking at my creation and look forward to seeing your impressions of our latest sketch challenge for this month of October.


Bye

Kylie

xx

Monday, October 14, 2013

Family Birthday Calendar Kits

A2Z Scraplets have just released a great NEW "Off the Page" project in time for Christmas. 
What a fantastic idea to give your family or friends as a special gift. 

For just $15 you get all the bits & pieces to make a 
"Family Birthdays Calendar".

Kit includes:
1 x 450mm long x 150mm wide 6mm plywood to use as the base 
1 x "Family Birthdays" Words - size approx: 164mm x 86mm & 242mm x 90mm
1 x Packet of Abbreviated Months - each piece approx 13.7mm high
1 x guide to place on edge of plywood for hole placement for screw eyes
14 x Screw Eyes
60 x O's to attach birthday circles
30 x circles (more can be ordered for an additional price)


All you need to do is put it together & decorate it using Paints/Inks/Stencils/Glitter/Paper - whatever your heart desires !!

Here's how I decorated mine 

I decided on a "Silver, Black & Blue" colour scheme and LOVE the end result.
I painted the base silver, stencilled on some butterflies & kindy glitzed them. The wording and months are inked black and then I have used dimensional magic so they jump out even more.
The 'circles' have been painted using a metallic paint and I've used a black thin sharpies to write the persons name and date on. 
Add some flowers & A2Z Scraplets Paisleys and my calendar is ready to give as a gift this Christmas. 
I was going to give it away but it looks way too awesome hanging on my wall :)


Design Team member Belinda Scott has also sent me through some photos of the one she made. As I kind of rushed her to finish, Belinda only had time to put her gorgeous girls birthdays on and will get around to completing it soon. I love the use of the photos on the circles instead of just the names/dates.


Belinda Scott is having a giveaway of a Family Calendar Kit over on her blog. 
Be sure to check it out and leave a comment to be in the draw. 

Amy will be back in a day or so to share what she's done with hers. 
Have we inspired you to get started on making those Christmas gifts ??? 
To order a kit (or 2 or 3 or 4) today, click the link below.


... Until Next Time ...
... Happy Scrappin' ...

Sunday, October 13, 2013

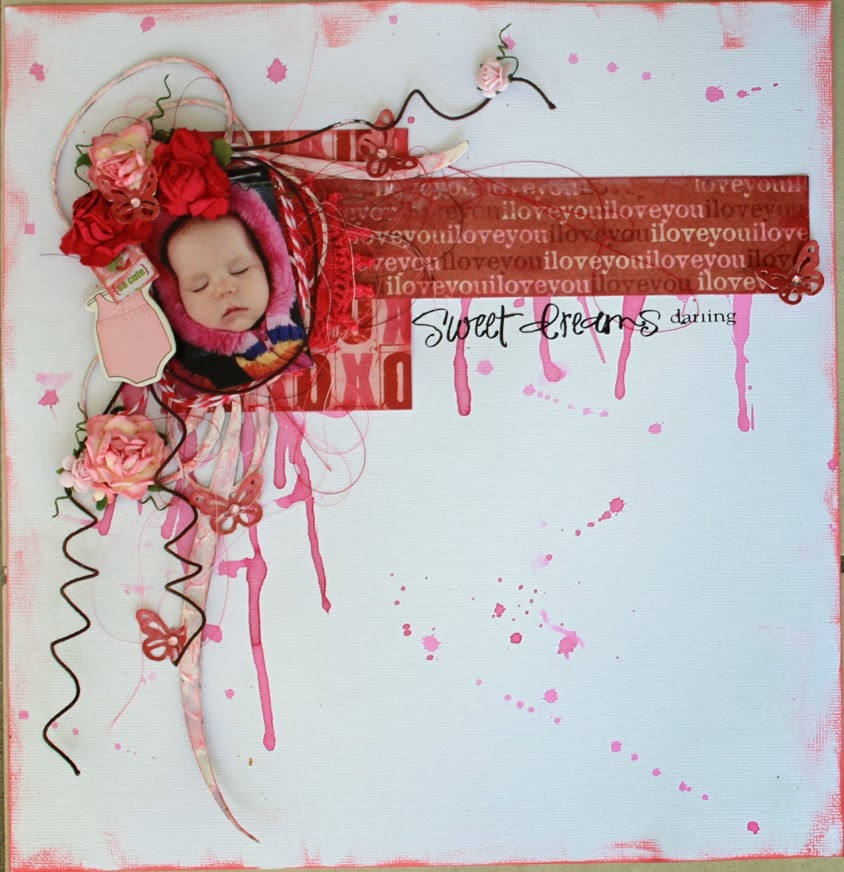
sweet dreams darling

hello again
bel here today to share another layout using the fantstsic a2z scraplets.
i have used doodlet #1


so here is my page...


and a close up


and another

i simply applied gesso with my fingers and while it was still wet i sprayed glimmermist on it. 
once it was dry i went over it with ink. 
i love this effect as the gesso is all bumpy and catches the glimmermist and ink differently. 
these scraplets are so affordable and you can buy them direct from julie who makes them herself.
just follow the above link and check it our. your shopping cart will be full before you know it.  

dont forget about the sketch challenge we are running this month. 
we love seeing your entries. 

i will be back to share another layout with another doodlet soon or you can follow me here

i hope you have had a great scrapping weekend


Thursday, October 10, 2013

Bringing the mini back

Bringing the Mini Back…. I bet you started to hum the tune to that Justin Timberlake song ‘bringing sexy back’. 

I'm going to start my blog post off with a bit of a story… hopefully it won’t take too long.

A long long time ago A2Z Scraplets created these amazing chipboard mini albums that were put together as words.  Do you remember the ones – they had titles like baby, smile, beach & family to name just a few. These mini albums were a great way to show off a few photos and also have some coffee table art in your home.

I remember my very first one – the beach album… I was lucky enough to have it published in a couple of magazines, it was even featured in a mini album mag. I was so impressed by these little albums that I knew then that I wanted to be a part of the A2Z Scraplets team and that my friends is where my love of chipboard products began.


These fantastic albums have not been around for a while and so after acquiring one (because I know this great lady who makes all this fabbo chipboard stuff) I got to work and created my very first chipboard mini album for 2013 and I know its not going to be the last one for this year either.

My first step was to prime all my pages with gesso. I have then given them a thin coat of aqua paint and have let that dried.


I then started to add more color layers to the pages before I added my photos and embellishments. Here I have used the Masklet Chevron 2. After spraying the mask I have used the remainder that was left on the mask and pressed it onto other pages to give a more grungy look. 

Next I chose my photos and the accents I wanted to use. I find that you do not need to add too much to the album as your photo or photos will take up a lot of the page. I try to keep embellishments minimal. Washi tape is great for this and small stickers and small metals. I also like to use twine or wire and beads on my pages as they do not overwhelm the photos.


Also think about using your masks and texture paste after you have added your pictures. Here i have used Stencil Flourish 2 to add a little more interest and tie together the photo and the page.


Above I have masked off part of the album and used a small part of the Flourish 2 stencil. This is also a great way to add interest without making your pages become to 'chunky' 


My final step before putting the rings in to hold it all together was to ink the edges and then add some stamping. I have also outlined all of the pages with a black pen which helps define them.\

So here are a few of the finished pages....


 I hope this has inspired you to create a mini album of your own... I am hoping to do a few for Christmas gifts.

tracey
xx